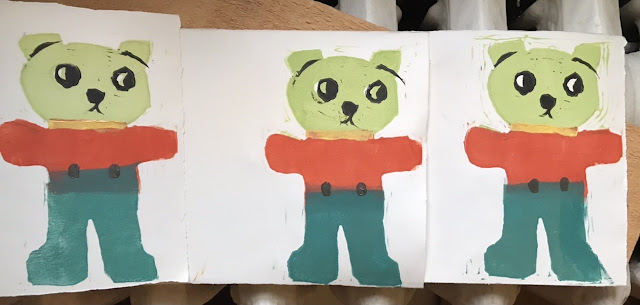
Here it is, the first Little Brother print! (I printed three of this color combo.) First of forty-nine, so says Marz, each in different colors. I will aim for seven.
You can see he is not terribly complicated, and you can also see how off my registration was, and other things. Printmaking is FUTZY. I do not know why I like such a futzy process, but I do. Maybe it's partly because I like handmade errors, and since they are hard to avoid in printmaking, errors are somewhat acceptable--small ones, anyway.
I watched an expert lino-printer on youTube who said as much:
"Don't worry about small errors; usually they are not even noticeable."
Here is how I made this reduction print.
1. Carve your image, then carve away the parts that you want to be plain-paper color--here, the whites of Little Brother's eyes and the background.
2, 3. Ink up the color (green) of the head (around the eyes), and print the green.
Then carve away the green, leaving the eyes and ear lines. Ink those up (black), and print on top of the green:
4. I realized afterward that I hadn't really needed to carve away the head, because I could've avoided it by inking up the shirt with a small brayer. But I did.
The colors were inspired by pimento olives, btw, but I'm not experienced in color mixing, so they're not very like.
5. Then, I didn't carve away the shirt, I just inked up the bottom half and wiped off any ink above the waist.
I cut separate little lino pieces (like rubber stamps) to print the yellow collar and brown buttons.
Ta-da!


If you say so, but to my unsophisticated, uneducated, noncritical but all appreciative eye, all the ink on the paper belongs there.
ReplyDeleteWell, thank you kindly for that, Joanne!
DeleteLooking good, Little Brother.
ReplyDeleteLittle Brother is chuffed.
Deleteso if you were to make multiple different colors you would have to make a block for each set since you carved away each part as you worked through the series? Seems like your second process where you carefully ink just the part you want to be a certain color would be more economical of the block material and carving?
ReplyDeleteCeci
Well, you’re right, sort of.
DeleteI’d still have to carve away the head to print the eyes (and ear lines), but could use the body over and over.
However, I don’t want each bear to look the same (except for color changes), like a rubber stamp.
Also, this is a learning exercise for me at this stage-/I want the practice of carving.
wow! i am finding this process so fascinating as i had no idea about this as a printing exercise. i've always liked futzy processes in anything art that i do. depth of color may come with experience.
ReplyDeletekirsten
I’m glad it’s interesting you. Me too! I knew none of this.
DeleteI assume —I hope!— that I’ll get better at color mixing…
I thought that you might have carved a block for every section but your printing makes better sense, although it hurt me to see Bear's face carved away. I also love to see the lines that make Bear seem to be in motion. The colors are mighty pleasing, too! SUCCESS!
ReplyDelete
ReplyDeleteThanks Linda Sue – – I’ve made four more now – – some more successful than others. This would’ve worked well as a jigsaw too– – where you cut sections apart